Wednesday, July 13, 2011

TV Stand!

Make sure you look at THIS and THIS post before you continue!

After I was completely done with all my spray painting, I did a little sanding around the edges and applied some craft paint in places to add some excitement!


 Green and blue...are you really surprised??

 a dab of blue here...

 a dab of brown there...

and a little smearing with a damp rag...

And then I added the knobs!

 Now I finally have a TV stand for the guest bedroom!


All for $7 (cost of spray paint)

What have you found on the side of the road lately?


Love,
Michelle


Tuesday, July 12, 2011

Another sneak peak...

Just because I love all of you soooo much I am going to give you a sneak peak in to my in-the-process-of being-restored piece of furniture...

Remember THIS post from just a couple of days ago?

Well, I just couldn't wait to start on this piece...

The previous owner did an awful spray paint job on this...I'm hoping mine turns out a little better :) 


And now for your sneak peak that I promised...

 After some stripping and sanding...


And some brown spray painting...


And a whole lotta light blue spray painting...


I have this! I must say, it is coming along good so far! But you haven't seen anything yet :) 

Love,
Michelle


Monday, July 11, 2011

Placemat Pillow!

I bought 4 placemats at Goodwill for super cheap, but they didn't really go well in my kitchen. I really liked the pattern so I figured I would just use them for the fabric. 

I found a really old rocking chair that I absolutely LOVE! It really needed a friend so I decided I would make one of the placemats in to a pillow to put on the chair. It was the easiest thing I think I have ever done. It probably took a total of 5 minutes! 

Here is how it goes...

 Get your placemat that you have put up and are not using 


 Take the stitching out of one of the sides


 Fill it with pillow stuffing


 Sew it back up


 It is that EASY!!! 


 I think it fits very well here!


P.S...How AMAZING is this old rocker that I found? I couldn't even do anything to it...I love it just the way it is!

Now go get your lonely placemat that you have put up in a drawer somewhere and get to work!

Love,
Michelle 


Friday, July 8, 2011

Steven's Findings

So I pretty much have the best boyfriend ever. 
I came home from work yesterday to him saying he had a surprise for me. He took me out to his truck where I find these uglies (soon to be beauties) calling my name: 


I am sooooooo excited to start these new projects! I am especially excited about this one:

I can't wait to get my hands on it!!! I'm thinking TV stand for my guest bedroom :) 


And how cool is this one? Not too sure what I will do with it yet, but I will come up with something fabulous!


I think Ashley approves :)


Special thanks to Steven for being so awesome and thrifty! I think I'm starting to rub off on him :) 

Love,
Michelle

Tuesday, July 5, 2011

Christmas in July

Last weekend when I was in Columbia I went to an estate sale down the road from my parents and found some cute Christmas decorations for pretty much nothing! I'm pretty much O.B.S.E.S.S.E.D. with Christmas decorations, or decorations in general for that matter, so of course I just had to get them!

Here are my findings: 


Since it is obviously not Christmas yet and I can not store anything that I just bought I thought hard about how I could use these in my house at this very moment...

I have been in the Gamecock spirit for days now after winning the National Championship AGAIN (which by the way, GOOOO COCKS! How AMAZING is that?!!) so I decided to make an addition to my Gamecock collection....

This makes me soooo very happy to look at! I LOVE MY GAMECOCKS!!!! AND this tree can be up all year around :) 


 I gathered up some stuff that I already had laying around...some fabric, ribbon, and beads...and of course these awesome balls that Santa gave me last year in my stocking!


Not only do we have the best team EVER but I don't think I could ever get sick of these colors! I just love them.


It definitely belongs right here!


As far as the adorb margarita glass looking decorations go...it took me a really long time to figure out a place for them. I'm running out of room to put stuff! But I managed to find a place in my kitchen that needed some love...

(I'm sorry these aren't too clear...I'm using my OLD camera because my other one broke...I need to get a new one!)


Just added a few tealight candles and grape decs that I had lying around...very simple and cute!


You can always find a way to incorporate some of your Christmas decorations all year around...you have proof right here!

Love,
Michelle

Friday, July 1, 2011

What to do with some decorative rocks...

Sometimes when I am browsing around my favorite stores (Hobby Lobby, Dollar Tree, Goodwill, Ross, etc.) I buy random things that I know will come in handy at some point in time. Or sometimes I come up with fun craft projects right there in the store. Either way, I have a pretty large collection of random thing-a-ma-jiggies that at some point I know will come in handy. I have had these four bags of decorative rocks for quite some time and I could never think of anything to do with them. Problem solved!

One of my many ocds is when shoes, socks, clothes in general are laying on the ground. It drives me nuts! Ask Steven :) Clothes belong either in the closet, in the dresser, in the hamper, or in the washer and shoes belong in the "shoe closet." However, I had a little dilemna. Sometimes, like when I am running in the house really quickly to grab something and then go right back out, I like to leave my shoes by the door. I also like having a pair of shoes by the door most of the time anyways so I can slip them on quickly when I need to take the dog out, trash out, etc. It is much more convenient and I usually don't like wearing shoes inside the house. Sooooo I came to thinking---how cool would it be to make something I can put by the door to put my shoes on. 

Of course they make shoe trays you can buy at the DT but how ugly and boring are those?!! So I decided to make my own unique version of a shoe tray out of decorative rocks I had on hand from the Dollar Tree.

Here is how it is done:


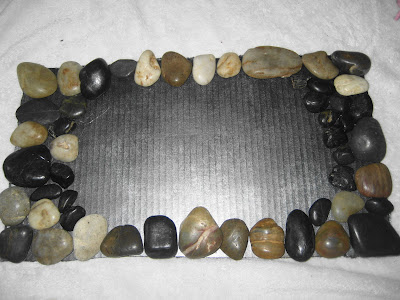
Find some cardboard (I had an empty box still lying around from my move) and some spray paint (whatever color will blend in well with the rocks, I had this one on hand). Spray paint the cardboard and let dry.


Then gather your decorative rocks, which can be found at most dollar stores or craft stores.


(note: the cute dog in the back, my craft buddy)
Start placing your rocks how you want them. I would have preferred to use all larger rocks like these above, but I didn't have enough. And because I like to make use of what I have and always find a way, I decided to line the larger rocks along the outside.


Get out your hot glue gun and start gluing...

And gluing...

 And gluing...

And gluing...

And you will have this.


Continue with the rest of your rocks. Be patient, I know it is a lot of gluing!


Now isn't that SOOOO MUCH BETTER! Now I have a place by the door to put my shoes...I think I might have to make one for the side and back doors as well! :)

Love,
Michelle


Blog Template by YummyLolly.com