What I love the most about envelope pillow covers is that you can switch them out whenever you want! I am the type of person that gets bored very easily. I can't look at the same thing for a long period of time. Pillows add a lot to a room and I just love mixing and matching them, putting different ones out depending on the season, holiday, mood I'm in, switching them out whenever I feel like it! Pillows can take up a lot of storage room also, so making envelope covers saves so much space! They are also less expensive, because you don't have to buy as many pillows or stuffing. All you have to do is fold them up and bring them out when you feel like it! And just keep covering the exact same pillow! Like this one...
This one pillow here will always have a different cover on it! And no one will ever know that it is the same pillow underneath!
Ok, on with the tutorial...
Step 1: Take the size of the pillow. Cut the fabric 1" bigger all around for the front piece of the pillow. For the back piece of the pillow, take the same width (1'' bigger) but take 4" longer in length (to make room for the overlapping part)
Ex. My pillow is 14"x14" so I will cut one piece of fabric 15"x15" and my other piece 15"x18''
Step 2: Take the back piece (the 15''x18'' piece) and measure half the length and cut down the middle. This should leave you with three pieces (the 15''x15'', and two 15''x9'')
Here are my three pieces
Step 3: For both back pieces, fold one of the longer sides 1/4" and then another 1/4". Iron down. Pin and sew all the way down (hem folded over towards wrong side of fabric). Sew as close to folded side as possible.
Folded, ironed, and pinned
Sew all the way down.
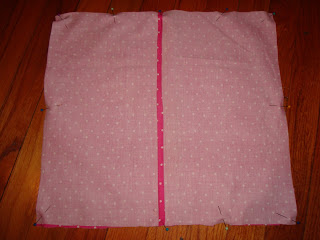
Step 4: Lay the front side down, with the RIGHT side facing you. Lay the back two pieces on top of the front piece, with the WRONG sides facing you (the RIGHT sides should be touching each other). Pin all the way around and stitch completely closed.
Clip all corners at an angle.
Step 5: FLIP and ENJOY!!!
And add whatever you want to it! Like a cute bow for a super cute baby that will be here before long! ;)
Love,
Michelle


0 comments:
Post a Comment