Wednesday, March 16, 2011

Lamp Makeover!

I showed you all a few days ago the U.G.L.Y. lamp I found at a thrift store. If you don't remember click here. So y'all must have been dying to see the transformation. I am pretty much obsessed with how this lamp turned out and can not WAIT to have it in my future craft room.

My beautiful masterpiece: 

Ahhh I just love it!


 Closer look at the shade


Closer look at the base. I just love the design!


Fabric on the shade look familiar? I'm sure you remember these cute pillows...


Can't wait to decorate my future craft room!

Love,
Michelle

Monday, March 14, 2011

OOPS!

So last night I went a little blog crazy and accidentally posted ALL of the posts I had written, but was going to wait and post throughout the week. So lucky for you, you get a sneak peak!

I hope everyone is having a great Monday!

Love,
Michelle

Sunday, March 13, 2011

Tutorial: Envelope Pillow Cover!

What I love the most about envelope pillow covers is that you can switch them out whenever you want! I am the type of person that gets bored very easily. I can't look at the same thing for a long period of time. Pillows add a lot to a room and I just love mixing and matching them, putting different ones out depending on the season, holiday, mood I'm in, switching them out whenever I feel like it! Pillows can take up a lot of storage room also, so making envelope covers saves so much space! They are also less expensive, because you don't have to buy as many pillows or stuffing. All you have to do is fold them up and bring them out when you feel like it! And just keep covering the exact same pillow! Like this one...

This one pillow here will always have a different cover on it! And no one will ever know that it is the same pillow underneath!

Ok, on with the tutorial...

Step 1:  Take the size of the pillow. Cut the fabric 1" bigger all around for the front piece of the pillow.  For the back piece of the pillow, take the same width (1'' bigger) but take 4" longer in length (to make room for the overlapping part) 
Ex. My pillow is 14"x14" so I will cut one piece of fabric 15"x15" and my other piece 15"x18''

Step 2: Take the back piece (the 15''x18'' piece) and measure half the length and cut down the middle. This should leave you with three pieces (the 15''x15'', and two 15''x9'')  

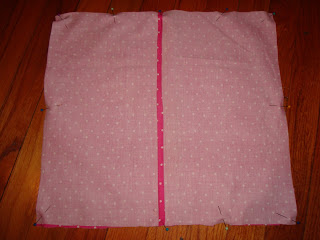
Here are my three pieces 


Step 3:  For both back pieces, fold one of the longer sides 1/4" and then another 1/4". Iron down. Pin and sew all the way down (hem folded over towards wrong side of fabric). Sew as close to folded side as possible. 

Folded, ironed, and pinned 


Sew all the way down. 


Step 4:  Lay the front side down, with the RIGHT side facing you.  Lay the back two pieces on top of the front piece, with the WRONG sides facing you (the RIGHT sides should be touching each other).  Pin all the way around and stitch completely closed. 

Clip all corners at an angle. 


Step 5:  FLIP and ENJOY!!!

And add whatever you want to it! Like a cute bow for a super cute baby that will be here before long! ;)

Love, 
Michelle

Tote Tutorial

Cutting Instructions: 

 Cut quilted fabric in to one 17" by 32" piece. This will be the body of the bag.


 Cut quilted fabric in to two 4" by 30" pieces. These will be the handles.


Cut regular fabric in to four 5.5" by 17" pieces. These will be the bands.


Making the handles: 

  Take each of the two handle pieces and draw a line down the center of the wrong side of the fabric. Fold the edges in to meet the center line. Iron.


  Fold each edge inward. Then, fold lengthwise again, enclosing raw edges.


 Pin and Iron.


  Topstitch handle pieces 1/4" from the edge along both lengths.


Finished handles!


Attaching bands and handles to bag:

 Place bag flat with right side (dot fabric) facing upward. Place one band right side (zebra stripe) facing upward along the top edge. Pin. 


 Place one handle on top of band making sure it is not twisted and lays flat. Pin. 


 Place another band WRONG side up on top of the handle matching the first band.  Pin in place. Stitch 1/2'' from the top edge, trim seam allowance to 1/4". 


 Fold the top band under to the wrong side (zebra stripe) of the bag, press along the top edge.  Turn raw edge on both bands under 1/2", press and pin in place through all layers.  Topstitch along the bottom and the top of the band.  
Repeat on the opposite side of the bag. 

Putting it all together: 

Turn bag inside out and stitch 1/2" from edges along both sides and bottom. Pin side seams and stitch 1/2" seams down both sides to enclose the raw edges. Stitch across the corners of the bag bottom. 


Turn bag right side out and ENJOY!!!


A girl can never have too many totes, that's for sure! 

Love,
Michelle

My very FIRST tote!

As you can probably tell, I have really gotten in to sewing, but all that I have really done so far are pillows. I am LOVING making pillows, don't get me wrong, but I decided it was time for me to broaden my horizons and make something else. I was in Wal-Mart and found this "Everyday Tote Kit." It included all of the materials and instructions on how to make the tote. PERFECT for a beginner like myself. I struggled a little bit, and it did not come out perfect, but I am proud of myself that I was able to actually complete it with out getting frustrated and giving up (which tends to happen a lot). So here is MY VERY FIRST TOTE...


I'm thinking a monogram might be cute to add!!!

Interested in how I made this? Tutorial coming soon...

Love,
Michelle 


What a difference...

A KNOB can make!

I love looking at all the different knobs when I go to places like Lowe's, Home Depot, Hobby Lobby, etc...Knobs can come in handy for a lot of things that you wouldn't normally think of. I remember one year I bought plain wooden knobs, painted them, screwed them in corks, and gave them to friends for Christmas presents (I have a lot of wine loving friends).

 Anyways, I bought some cute knobs at Hobby Lobby (where else?!!) for my desk that I wanted to share with you. They really do make something simple and plain like a desk look so much better!


I just love them! They are going to be a great touch to my craft room I anxiously await to do!

Love,
Michelle

And the find of the day was...

Soooo remember when I showed you all of my awesome thrifty finds the other day?  I promised I would show you my MOST FAVORITE of them all.  Well the anticipation has come to an end people! 

Drum roll please...


WAAALAAA!!!
(Yes, I get really excited about things like this...)

Definitely in need of some TLC, but I see great potential in this floor lamp!


I can't wait to show you what I have planned for this ugly, boring, plain, depressing lamp shade.


This lamp is about have a MAJOR MAKEOVER. Kiss the ugliness goodbye!!!
Love,
Michelle 


Wednesday, March 9, 2011

Feelin' Thrifty!

Well, today I was just in one of those THRIFTY kinds of moods. I didn't find as much as I hoped to, but I did walk away with a few bargains: 

All my finds!
 I LOVE this green glass pitcher. I really needed another one of these too.

I got 4 big plates and 6 little plates. All for $3! (Originally from Target) I just love this design.

I have some fabulous ideas with what I can do with this!

YAY!!!

I just love this :)

And my MOST FAVORITE FIND OF ALL.....

Well, you are just going to have to wait and see. But I PROMISE, you are going to LOVE it once I am done with it!!!

Love,
Michelle


Saturday, March 5, 2011

Miss Rachel Robin

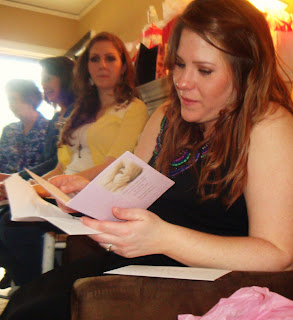
So today was a great day...Rebekah threw the most amazingly beautiful baby shower for Mary.  It had a beautiful bird theme (hence Rachel Robin, who will be here in about two months!). Not only was it a wonderful shower for the mother-to-be, but it was so nice to see and hang out with my lovely cousins, whom I just don't get to see enough! 

Of course as soon as I found out Mary was expecting a girl, all these cute ideas went running through my head...lets just say, Miss Rachel Robin is going to be VERY spoiled by her Aunt Michelle. I can not WAIT to make her cute little dresses, but for now, until I become a better sewer, I made her some cute pillows for her baby room.  I also made some adorable hair bows. A girl can never have too many bows, right? 

Here is what I made:


I just LOVE making these bows. They are so easy and add such a cute touch! I just HAD to make Rachel a cute girlie zebra bow, considering how much her mom loves the print and I am sure will dress her in it often. And the one at the bottom of the first picture will be so cute with her GAMECOCK cheerleader outfit and any other Carolina apparel that I can totally see her daddy dressing her in.


Girlie pink pillow


Little soft birdie pillow for Rachel Robin to sleep with 


Gotta have the monogrammed pillow to match the pink, green, and white baby room!

Rebekah did a fabulous job with all of the decorations:  


And the food was delicious: 


Mary was showered with lots of great gifts: 


Awesome diaper cake April made!


Lizzie loved the presents too :)


And the best part of all....getting to spend time with my family :) 


The mother-to-be and I


Cousins <3


The fabulous host and mother-to-be 

Can't wait for many more of these in the future :)

Love,
Michelle


Blog Template by YummyLolly.com